Finally! A handy dandy chipboard cutting guide! Now YOU don't have to go to the trouble and expense of finding out what will work, and what wont! I went thru and test cut several thicknesses (gauges) with and without the clay coat (white shiny-ish side) and here's the skinny!
*A new blade and mat work best!*
.022- this is like a heavy cardstock, blade:5-6, pressure:max,
speed: 4, multi cut:2
.024- think cereal box- same as .022, if clay coated, multi cut:3
.028- IDEAL for cricut usage! blade:6, pressure:max, speed: 4-5
multi cut:4
.032- depending on the way your blade was cut (some are cut with a deeper bevel than others) this will work with the above settings. A long bevel works better, than a shorter one. With a short bevel, the blade on some sections of the cut did not make it all the way thru (like you'd see cutting cartstock with a dull blade) and I needed to go around it lightly with my craft knife. It was just barely attached. I did get a very clean edge running around it with the craft knife though. Compared to the .028 the difference in thickness is nominal.
.040+ is too thick, the blade depth is insufficient to make it through the thickness. It will go thru the machine, but you will have to hand cut it the rest of the way. ANYTHING thicker than .040 is too thick and will damage your machine rollers! I do NOT reccomend anything thicker than .032! It's just not worth damaging your machine and voiding the warranty.
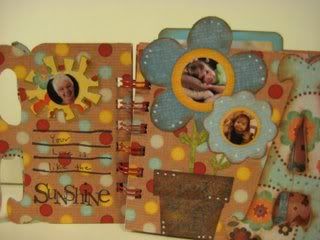
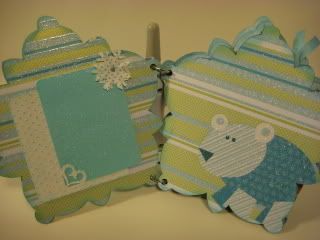
Other info: I prefer the look of plain chipboard, but the clay coating really does make a difference in the stability of the peice. It makes it more rigid, and is ideal for tag books/word books where you want the strength. The grain is finer, and smoother and is also easier to adhere papers to. Stamping/inking and writing on it will vary depending on the specific product.
The good news with the "way too thick chipboard" is it works beautifully with the Bind-it-All machines, and works well for making your own hard-bound book bindings. You can watch a video and download printable instructions on hard binding here:
http://sbl.tvweekly.com/player.php?43030134c9d51a817d55521d538909d5y1268
I hope you all can use this information! Chipboard is really very fun!
*update* The above depth and pressure settings do NOT change because of the new blade housing and blades. You may be able to get away with fewer passes though. You still can not cut anything thicker than a .040! It simply will not feed thru the machine, and you run the risk of breaking it. This has NOTHING to do with the new blade housing's capabilities. This is simply the limit of the machine.
If you are having problems with the edge shredding it can be due to a number of reasons.
-your blade may be dull
-your stock may not be of appropriate quality or density not all chipboard is meant to be cut in this manner
-you may have bits of chipboard debris in the blade housing preventing the blade from swiveling perfectly. How to fix this will come a little later in the post.
-your stock may have shifted slightly
-the mat may be warped or just plain worn out.
-the blade did not line up perfectly on multiple cuts. This can be an intermittant problem, or a flaw in the machine. Try letting the machine rest a while, cut something else, and then changing mats and blades. I find the more times I cut the same thing in the same spot, this is more likely to happen.
I have been using a 60 degree blade (Cricut standard blade is a 45 degree blade) for several months now to cut .028 chipboard. It makes a HUGE difference. They will work in the green blade housing to improve your cuts. They can be purchased from vinyl sign suppliers under the name "roland compatable 60 degree blade". These are not a new item. They have been in use in other plotter machines for many many years.
To remove debris from the blade housing you will need a toothpick, and some tape style adhesive.
-remove your blade and remove any debris you can easliy with your fingers
-add adhesive about 1/4" wide around the tip of the tooth pick and gently poke it into the blade housing. This will stick any paper bits to it. You can pull the bits off and do it agian. Just make sure you aren't ramming anything down into the housing.
-lubricate and reinsert blade into housing
To lubricate the blade and housing you will need a tiny bottle of sewing machine oil.
-remove the blade
-make sure the housing is clean
-add a tiny drop of sewing machine oil to the non sharp end BLADE SHAFT. DO NOT put it into the housing!
-spread it around and wipe any excess off with your FINGERS and wipe your fingers off. You don't want it all drippy, you just want a nice light coating. This will also help keep your blades and housing from rusting if you live in a high humidity climate.
-reinsert blade
All this being said, keep trying. It works. It may take some practice, and some individual adjustments for your own machine...but it does work! Oh, and since I do not work for PC or any other entity, this is all SUGGESTION. I will not be held responsible for anything you choose to try. Every machine is different, as are the users.